Welcome to
Happy Monday pawesome pals
Thanks for joining us for the third Easter Crafting with Cats segment, and it's now officially an Easter Eggstravaganza crafting bonanza! MOL Mew know we have so much fun making all this stuff, and we hope mew enjoy seeing it and/or making it too.
If mew missed any of our previous CWC posts, stop by the Crafting with Cats Page and see all our previous projects, and mew don't have to be an expert in anything to make any of them. Plus, we offer workarounds and no-sew projects for those who don't like to sew.
To see the previous Easter projects click the links below:
**A quick note before we begin**
All Crafting with Cats ideas and creations are of our own design, and we share them for purrsonal/home use only.
So purrlease do not copy for commercial/resale purrposes.
Copyright ©BionicBasil®
* * *
This time we're making the pawesome
What We Used:
3 x cardboard boxes
2 x cardboard tubes
sisal rope
glue gun
sticky-back plastic
2 cable ties
scissors
fabric scraps for cushion + wadding + pom pom trim + sewing machine
plus some cute feline accessories for the desk
Optional Cat ~ Parsley was today's Craft Room Snoopervisor
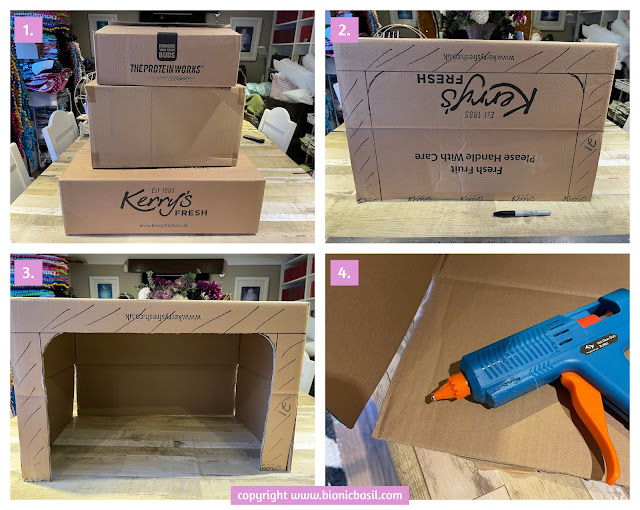
2. Using the largest box at the bottom of the pile, we opened up the flaps to increase the height and drew an opening.
3. & 4. Next, we cut out the opening and glued the loose flaps in place.
5. Then we used the top box to create the shelving unit for the back of the desk.
6. & 7. Cut all the flaps off and glue the two longer ones together.
8. This is what our desk looked like at this point.
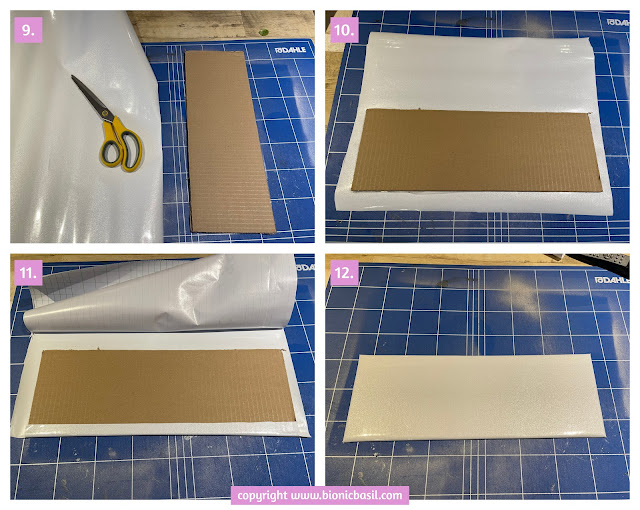
9. - 12. Instead of painting, we found some white sticky-back plastic we had in stock, so we decided to use that to cover everything.
13. & 14. Place the box on sticky-back plastic. Trace around the box so mew have a template that looks like this.
15. Cut out leaving about a 1" or 2.5 cm extra allowance around the edge. Cut an exact replica, so mew now have two identical pieces.
16. This was the tricky part; covering the inside of the box first. It took a little time to manoeuvre everything into place, but our top tip is to leave the backing on the flaps while mew stick the bottom piece in place first, then do one flap at a time. And repeat for the outside of the box.
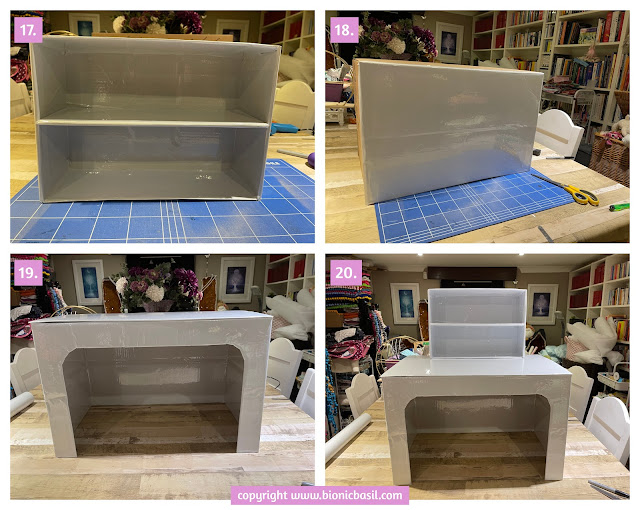
17. This is the finished shelf unit once the extra shelf was glued into place.
18. & 19. Next, we covered the desk inside and out.
20. This is how it looked after the shelf unit was glued at the back of the desk.
21. We used the middle box to make the chair.
22. We measured how high the seat needed to be, by offering it up against the desk.
23. We cut down the sides to the pen mark and then glued one of the cardboard tubes cut in half to provide extra support under the seat.
24. Next we folded and glued all the flaps in place until it looked like this, a cute little box chair. Then we covered it in sticky-back plastic.
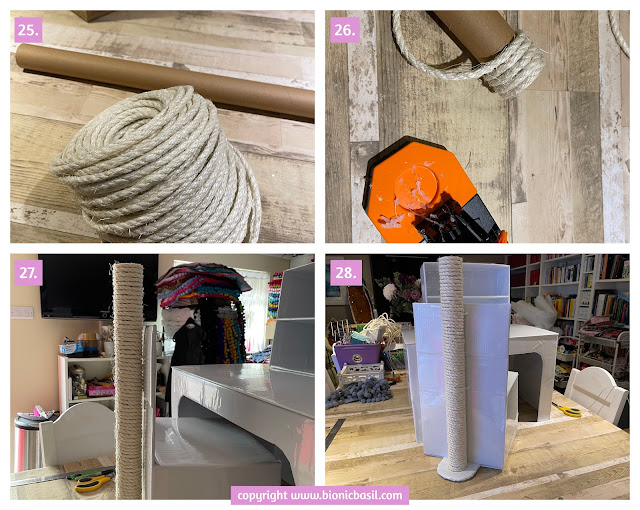
25. & 26. We used the 2nd cardboard tube to make a scratch post for the back of the chair. This also makes the chair more stable. Just glue the rope around the tube.
27. Then, using the cable ties, we secured it to the chair at the top and at the base of the seat.
28. To make it a little prettier at the bottom, we made a little holder that the bottom of the scratch post is glued into, stabilising it further. And here's the finished chair.
29. & 30. Parsley came to check on how things were going, and this is the final product.
31. Using some fabric scraps, we made a small cushion pad for the chair and trimmed it with pom poms. Then, we used double-sided tape to stick it to the chair seat so it wouldn't slip off.
32. To finish it off, we made a large woolly pom pom to stick on top of the scratch post and then added a few desk essentials, such as a jar of catnip, a green mouse, and some feather wands, plus a few stationery items.
And voila, mew have the purrfect desk and workspace for your kitty.
If mew'd like to watch the creation of the desk and chair plus see what The B Team thought of their new furniture, just click play!
or watch direct on YouTube
We think The Work, Scratch 'n' Play Desk and Chair turned out epically epic, and it's now in our BBHQ office for whenever anyone wants to write the blog or a book or two!
That pawesome furiends, furry sadly brings us to the end of our third Easter Crafting with Cats rerun. We do hope mew liked it, and we look forward to sharing more crafting exploits from BBHQ later in the week!
We'll be back tomorrow with the epilogue of Claws of Terror. If mew missed last week's action and adventure in Chapter Twenty, click here to catch up.
Epically crafty purrs
Wing Commander Basil & The B Team
Disclaimer:
We at BionicBasil HQ are not responsible or liable fur any injuries to person/s and/or cat/s, crafting addictions, glue on cats, paper cuts, misplaced pins and needles, cats stealing your supplies, broken scissors, cat fur stuck on your projects, or your project not turning out as planned. By using this information you hereby agree to indemnify and hold harmless BionicBasil and staff from and against any and all claims for personal injuries or damages of any kind arising from use of any Crafting With Cats posts we may share.
Graphics created with paid licence www.canva.com and Music Licence from www.soundstrip.com


Wow, that's a set-up any office cat would be proud of!
ReplyDeleteThat is a great desk and chair.
ReplyDeleteGreat fur kitties with thumbs to blog type. I'd use the scratchy post. And Lynn says it's
ReplyDeletehard to believe Easter is almost here. Precious
Oh what a fabulous project and so well done. You're so talented.
ReplyDeleteThank you for joining the Awww Mondays Blog Hop.
Have a fabulous Awww Monday and week. Scritches to all the kitties and a big hug to your wonderful mom. ♥
Very 😎 cool! Great for any and all office kitties!
ReplyDeleteAnother amazing masterpiece from the mind of the P.A.!!!!
ReplyDeleteAmazing love this for all those office cats....you should publish a book on crafts for cats.xx😽🐈⬛🐾
ReplyDelete