Welcome to
Happy Monday fabulous furiends
Welcome to Gardening with Cats revisited; this was another really popular post from 2018.
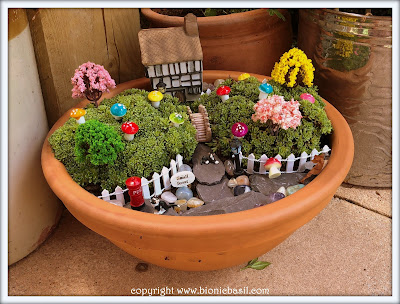
We did enjoy making this cute crystal fairy garden, and in July 2021 we finally had to empty the pot, as it had become a little unkempt, but the good news is; IT LASTED 3 YEARS!
We are growing agapanthus in that pot now, this is its second year, and it hasn't flowered yet. We've grown about 12 of them each in their own pot, and only two have flowered so far. Apparently, they like their roots constricted or to be potbound for a couple of years before they're planted out in the garden to get the best show.
Also, we're just working on the back corner, that's been an ugly, unsightly mess.
On the left is how it has looked for the last couple of years, and the one on the right was last week.
The P.A. was thinking about decking it, however, it is really uneven and is higher than the rest of the garden, so it would require a mini digger to level the ground as it is un-diggable by hand due to rubble put there by Uncle John years ago. And mew can't access that part of the garden without damaging the patio, so after a bit of thought and utilising sleepers we already had, she decided on making some raised beds.
There will be four around the outer edge, and the middle one will be much smaller than in the photo on the right. Then she will add gravel paths around, so it should look quite nice. Maybe the agapanthus will find homes in these new beds? Let us know if mew want to see more of this project.
Let's Make A Crystal Fairy Garden
What Mew Will Need:
Plant pot or similar
A selection of cat furiendly plants
Crystals and a few pieces of slate or stone/gravel
Organic compost + optional gloves when handling
Fairy House
and cute small stuff - we bought ours from Amazon - just type fairy garden in the search bar to get lots of options.
A selection of cat furiendly plants
Crystals and a few pieces of slate or stone/gravel
Organic compost + optional gloves when handling
Fairy House
and cute small stuff - we bought ours from Amazon - just type fairy garden in the search bar to get lots of options.
**Top Tip**
Health & Safety Always Comes Furst at BB HQ
Health & Safety Always Comes Furst at BB HQ
Keep small objects away from curious paws & claws and also remember that this is not for younger children/toddlers who may want to disassemble your hard wurk in seconds, as they won't be able to help themselves - it's their nature, and also there's a pawsible choking hazard too - so purrlease keep a close watch on small hoomans with little or no life experience under their belts, and with an aching desire to put most things they touch in their mouths!
And the same goes for kittens and younger cats who may be enthralled with your creation and decide to nom on it. Remember that this is not a cat toy and the small bits and pieces are potential hazards.
Our fairy garden is placed out of reach of all the aforementioned, just to be on the safe side.
And the same goes for kittens and younger cats who may be enthralled with your creation and decide to nom on it. Remember that this is not a cat toy and the small bits and pieces are potential hazards.
Our fairy garden is placed out of reach of all the aforementioned, just to be on the safe side.
Are mew ready to get started? of course mew are! MOL
Here's the pot we bought, and we chose 2 alpines that will have a plethora of gorgeous white flowers when they get going.
**Top Tip**
Before planting, make sure mew water the plants thoroughly
1. Put a few stones or slate in the bottom of your pot to assist with drainage.
2. Place a small amount of compost in the pot and then add your plants where mew want them.
3. Fill with more soil until your plants are nicely firmed in and then water.
4. When mew're ready, place your newly potted plants on a table - now our table is a scrub-top one in the craft room so we neffur put anything on there to protect it, but if mew're using your kitchen/dining or other indoor table purrlease make sure mew use either newspaper, cardboard or similar to protect the finish.
5. The fun part... get all your fairy garden things ready to put in place. Our fairy house was actually bought from a second-hand store/charity shop, so it's always an idea to check those stores as the treasure mew can find sometimes is quite fabulous.
6. As mew can see we placed our trees in the 'hills' and put the bridge them between so the fairies don't have to struggle to get home aftur a hard day's graft! MOL
7. Next we added a few pieces of slate to make a path to the bridge and then on to the house.
10. And there mew have it...
11. Do mew think the fairies will like it?
It took less than 20 minutes from start to finish, so it's a fab little garden project if mew're short on time.
Mew can also make this without real plants; use fake plants, furget the compost and fill your pot with gravel and then add all your fairy decorations and then mew can glue effurything in place.
As we said earlier, we wouldn't leave it out year-round, we will purrobably put ours under the garden port for the winter months and water periodically.

Well, that sadly brings us to the end of another Gardening with Cats, we do hope mew enjoyed it, and do let us know if mew decide to make your own Crystal Fairy Garden.
We'll be back on Wednesday with some more BBHQ gossip and again Friday with some more Fluffers, so do stop by to see who is the biggest fluffer this week.
Until then
Epic green-pawed purrs
Basil & The B Team
Disclaimer:
We at BionicBasil HQ are not responsible or liable fur any injuries to person/s and/or cat/s, gardening addictions, compost on cats, misplaced tools and gloves, cats stealing your string, broken plants, or your project not turning out as planned. By using this information you hereby agree to indemnify and hold harmless BionicBasil and staff from and against any and all claims for personal injuries or damages of any kind arising from the use of any Gardening With Cats posts we may share.
Graphics created with paid license www.canva.com and www.pizap.com


