Showing posts with label easy craft project. Show all posts

Monday, 16 December 2024

**CATMAS SPECIAL** CRAFTING WITH CATS RERUN ~ HOW WE MADE OUR FURRY OWN EPICALLY EPIC CATMAS TREE SCRATCHER WITH VELCRO CATNIP ORNAMENTS

Festive Crafting with Cats Banner ©BionicBasil®

 Supurr Festive Greetings Pawesome Pals

Welcome to the second of our Crafting with Cats Catmas Specials.  

If mew missed any of our previous CWC posts, stop by the Crafting with Cats Page and see all our previous projects, and mew don't have to be an expert in anything to make any of them.  Plus we offer workarounds and no-sew projects for those who don't like to sew.

*    *    *
**A quick note before we begin**

All Crafting with Cats ideas and creations are of our own design, and we share them for purrsonal/home use only.

  So purrlease do not copy fur commercial/resale purrposes.

Copyright ©BionicBasil®

*     *     *

In today's Crafting with Cats, we're making the only Catmas tree mew'll ever need: 

Catmas Crafting with Cats Special ©BionicBasil® Catmas Tree Scratcher with Velcro Catnip Ornaments

Catmas Tree Scratcher with Velcro Catnip Ornaments

What We Used:

One x Road Cone 750mm or  29.5" high

Sisal rope ~ we used 60 m x 6mm or 196ft in black

Faux fur for bottom ~ we used dark green

Felt squares ~ we used red, white and green

Velcro tape ~ we used black

Ribbons for trim

stuffing/wadding

Optional sparkly pom poms

Catnip ~ organic homegrown extra-strong primo quality

scissors, non-toxic glue/glue gun, cotton thread, sewing machine, or needle

>^.^<

Optional Cat ~ Smooch was today's Craft Room Snoopervisor

Catmas Crafting with Cats Special ©BionicBasil® Catmas Tree Scratcher with Velcro Catnip Ornaments - Snoopervisor Smooch


Let's Get Started on The Tree

Catmas Crafting with Cats Special ©BionicBasil® Catmas Tree Scratcher with Velcro Catnip Ornaments - Steps 1 to 4

1. - 4. Get a road cone. We purchased ours from Amazon. We placed it on a lazy-susan turntable, which made it much easier to glue the sisal rope in place. Just glue a few centimetres/inches at a time until the entire cone is covered as above. This cone is 750 mm or 29.5" high and took approx 60 metres or 196 ft of rope. It did take a while to glue as mew can imagine, but it looks purretty nifty when done. Leave the last couple of metres/6ft or so until mew have finished steps 5 to 11.

Catmas Crafting with Cats Special ©BionicBasil® Catmas Tree Scratcher with Velcro Catnip Ornaments - Steps 5 to 8

5. Take your faux fur and cut to size, leaving enough to finish underneath.

6. Measure the circumference at the base of the cone; ours is approx 90 cm or 35.4".

7.  Draw the same size circle in the middle of the faux fur.

8. Cut out the hole, and mew should have something that looks like this.

Catmas Crafting with Cats Special ©BionicBasil® Catmas Tree Scratcher with Velcro Catnip Ornaments - Steps 9 to 12

9. Check that is fits properly, tucking it under the rope.

10. We used regular non-toxic PVA glue for this stage and coated the entire base in a thick layer.

11. Place the faux fur in situ and gently press onto the glue. Leave to dry and then glue the edges to the underside to finish. Finally, glue the last part of the sisal rope to finish off, we stuck ours to the faux fur and the rope above to make sure it was secure.

12. Mew should now have a finished Catmas Tree Scratcher, that looks something like this.

Let's Decorate The Tree

The Catnip Star Tree Topper

Catmas Crafting with Cats Special ©BionicBasil® Catmas Tree Scratcher with Velcro Catnip Ornaments - Catnip Star

1. We created a simple 4 point design with a longer point at the bottom, so it can be stuffed into the top of the tree, but still easily pulled out.

2. Cut 2 pieces in your chosen fabric and stitch around the edge, leaving a small gap for stuffing and catnip.

3. BBHQ epically epic catnip.

4. Sew up the gap, and mew should have something that looks like this.

Catmas Crafting with Cats Special ©BionicBasil® Catmas Tree Scratcher with Velcro Catnip Ornaments - Snoopervisor Pandora

Pandora came to snoopervise at this point and to also do a bit of quality control! MOL

*    *    *

 The Velcro Catnip Ornaments 

Catmas Crafting with Cats Special ©BionicBasil® Catmas Tree Scratcher with Velcro Catnip Ornaments - Catnip Ornaments

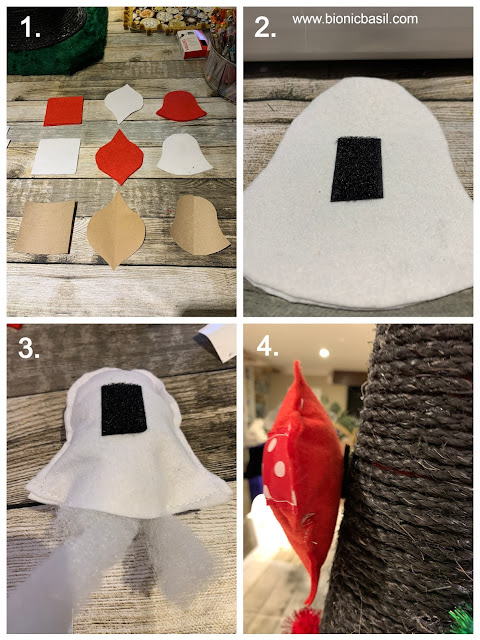
1. We chose a basic square for a pressie, a shaped bauble and a bell for our catnip ornaments, but mew could make anything mew like.

2. Hot glue the soft-side of the velcro to the back of each toy 

3.  Decorate with ribbon. Stitch together and follow the steps for the Catmas Star.

4. Hot glue the rough/scratchy side of the velcro to the tree, attach the toy and repeat until mew have made all your catnip decorations. 

And mew should have something that looks like this...

Isn't it epically epic?

Catmas Crafting with Cats Special ©BionicBasil® Catmas Tree Scratcher with Velcro Catnip Ornaments

We added a few red and green sparkly pom-poms, glued velcro on to those too and attached to the tree.

It's supurr sturdy too, so don't worry about it toppling over, as it has a nice weight to it.


So what did we think to our special Catmas Tree? 

Catmas Crafting with Cats Special ©BionicBasil® Catmas Tree Scratcher with Fudge

Fudge went straight for the star, Parsley and Melvyn also really enjoyed it.

Catmas Crafting with Cats Special ©BionicBasil® Catmas Tree Scratcher with Fudge Parsley & Melvyn

Stop by our Instagram account as we'll be posting the video's there and mew can see just how much we love our tree and what fun we're having with it.

In all honesty, this project turned out so much better than we could have ever imagined and for all those kitties being yelled at for climbing real Catmas trees, get your staff to make mew one of these, and mew can pull the ornaments off to your heart's content, climb it, scratch it, steal the star and generally be as naughty as mew like and it doesn't matter a hoot!

We think it's one of the best things we've ever made, what do mew guys think?


Health and Safety

Here at BBHQ, toys with pom poms on are only available to The B Team when the P.A. is snoopervising the play session.

Use pom pom toys under supervision only.  

Or mew can just make the Catmas Tree Scratcher without the pom poms.  If your kitty is a total heathen toy destroyer, definitely make it without the pom poms! 

Mew should regularly check shop bought toys too, and throw away anything that is damaged, broken or defective.


And that furiends furry sadly brings us to the end of our second Catmas Crafting with Cats post, we do hope mew liked it, and if mew decide to make your furry own Catmas Tree Scratcher, we'd love to see, so feel free to tag us on social media @BionicBasil - Instagram & Twitter or @BionicBasilCats on TikTok.

So we'll sign off on this bright and breezy Monday and look forward to your company on Wednesday's Midweek News.

In the meantime

Keep calm and have a niptini, well it is almost Catmas! MOL

Festive purrs

Wing Commander Basil & The B Team


Don't furget to subscribe to our blog and never miss another post. 

Disclaimer:
We at BionicBasil HQ are not responsible or liable fur any injuries to person/s and/or cat/s, crafting addictions, glue on cats, paper cuts, misplaced pins and needles, cats stealing your supplies, broken scissors, cat fur stuck on your projects, or your project not turning out as planned.  By using this information you hereby agree to indemnify and hold harmless BionicBasil and staff from and against any and all claims for personal injuries or damages of any kind arising from use of any Crafting With Cats posts we may share.

Graphics created with paid licence www.canva.com 

Tuesday, 29 October 2024

**BRAND NEW PROJECT** Spooky Crafting With Cats ~ Part 32 ~ Halloween Special ~ How We Made The Supurr Fun Magic* Pumpkin Catnip Wand

The B Team's Halloween Crafting with Cats Banner  ©BionicBasil® October  23

Supurr Spooky Greetings Pawesome Pals

Thanks for joining us for a brand new Halloween Crafting with Cats post. Mew know we have so much fun making all this stuff, and we hope mew enjoy seeing it!

If mew missed any of our previous CWC posts, stop by the Crafting with Cats Page and see all our previous projects, and mew don't have to be an expert in anything to make any of them.  Plus, we offer workarounds and no-sew projects for those who don't like to sew.


*    *    *
**A quick note before we begin**

All Crafting with Cats ideas and creations are of our own design, and we share them for purrsonal/home use only.

  So purrlease do not copy for commercial/resale purrposes.

Copyright ©BionicBasil®

Halloween Pawty Divider ©BionicBasil®

The Magic* Pumpkin Catnip Wand

Halloween Special Crafting with Cats ©BionicBasil® The Magic Pumpkin Catnip Wand

 Isn't it epic?

*It's magic because it's got oodles of catnip inside! MOL MOL

Halloween Pawty Divider ©BionicBasil®

What We Used:

Orange faux fur fabric

Non Toxic glue + Glue gun

String

Green feathers

Tinkly bell

Wooden dowel

Catnip 

Stuffing or wadding

Needle ~ Thread ~ Scissors ~ Sticky Tape ~ Optional Sewing Machine

Today's project was made with supplies we already had in the craft room.

Halloween Pawty Divider ©BionicBasil®

Let's Get Started 

Halloween Special Crafting with Cats ©BionicBasil® The Magic Pumpkin Catnip Wand - Steps 1 - 4

1. We used some leftover fabric and other supplies in the craft room.

2.  We cut a circle for our pumpkin in the orange faux fur about 7.5" or just under 17 cm in diameter. (We used a 5L paint can to draw around!!! MOL)

3. Next, we cut three lengths of string as 48" or 108 cm.

4. Tying a knot to join them together.

Halloween Special Crafting with Cats ©BionicBasil® The Magic Pumpkin Catnip Wand - Steps 5 - 8

5. & 6. & 7.  Taping the string to the table, we plaited the three lengths together. We only did this because the sting was very thin and wouldn't have lasted two minutes with our claws. But if mew have a thicker string or twine, then mew can skip these steps.

8.  Place the string in the centre of the faux fur on the inside.

Halloween Special Crafting with Cats ©BionicBasil® The Magic Pumpkin Catnip Wand - Steps 9 - 12

9.  Stitch the string to the faux fur. The reason we did this is because most wand toys detach too easily, so we're trying to mitigate that.

10.  And for extra security, we added a blob of hot glue.

11.  Then, we did a simple running stitch all the way around the edge of the faux fur. Leaving the needle attached to the thread as it's needed later on. So, don't snip anything yet!

12.  Gently pull the stitches so the pumpkin shape begins to form. **Make sure the end of the thread is secure before pulling the stitches. Otherwise, mew will just pull all the thread out.

Halloween Special Crafting with Cats ©BionicBasil® The Magic Pumpkin Catnip Wand - Steps 13 - 16

13. & 14. The fun part!!! MOL   
Add as much catnip as mew want to the pumpkin, and then use some wadding to fill the rest to the top.

15.  Pull the stitches tighter so it's almost a fully formed pumpkin. Next, take the feathers and test them in situ for the right aesthetic.

16.  And then, using more hot glue, dab a little on the bottom of each feather and stick them into the top of the pumpkin. 

Halloween Special Crafting with Cats ©BionicBasil® The Magic Pumpkin Catnip Wand - Steps 17 - 20

17. & 
18. While the feathers are drying. Take the other end of the string and, using more hot glue, begin to secure the string to the end of the wand, wrapping it tightly and glueing it down as mew go until it reaches the bottom of the wooden dowel.

19.  Back to the top of the pumpkin. Pull the thread as tight as it will go and stitch the opening closed, making sure to secure the feathers as well. Then we used a small bell from another toy Melvyn recently destroyed in between the feathers. 

20.  Finally, using a little square of orange felt, we cut enough to make an end cap.

Halloween Special Crafting with Cats ©BionicBasil® The Magic Pumpkin Catnip Wand - Steps 21 - 24

21. & 
22. & 23.  Check that the felt is big enough to overlap the dowel and fold in half, then stitch either by hand or on a sewing machine across one end and down the side. Place a tiny blob of glue on the end of the wand, then push the wand into the end cap. 

24. And voila, mew should have a really nifty, supurr fun pumpkin wand toy.

And there mew have it, only 24 easy peasy, supurr simple steps to making your very own  Magic* Pumpkin Catnip Wand! MOL 

It took just under an hour to make, so not that long, and that's us making something that we had no clue about when we walked into the craft room and pondered over the supplies we had in stock, so it should take mew much less time.

Halloween Pawty Divider ©BionicBasil®

Let's see what Melvyn and Fudge Thought.

Halloween Special Crafting with Cats ©BionicBasil® Fudge and The Magic Pumpkin Catnip Wand

Smooch and Parsley were snoozing while these two heathens had some fun!

Watch our video on YouTube.

Direct YouTube link

Yes, they are loving it. Smooch did appear to investigate and was horrified to learn that it had been slobbered all over and promptly harumphed and stalked off in a huff, shouting at the P.A., "Mew'd better make me one all for myself!"

And before mew say a word, we know the pumpkin is too big to flick around, but it was more of a 'chase me' toy, as the P.A. wanted something that Melvyn couldn't kill and decimate totally in under three seconds. So far, the pumpkin has survived being severely stalked, pounced on, repeatedly pursued and kicked to fluff over the last few days.

But, the good news is, mew can always make the pumpkin any size mew want; a gold ball size would be purrfect for flicking.

Halloween Pawty Divider ©BionicBasil®

PURRLEASE NOTE

HEALTH AND SAFETY NOTICE

Just before we go, we must say,

 NEVER EVER EVER 

...leave your kitty unattended with: 

wand toys, teaser toys or any toys which could be a potential hazard

When we're finished playing, we always make certain that any ribbons or string are wrapped around the handle before being put away in the toy box until next time.

Halloween Pawty Divider ©BionicBasil®

And that furiends furry sadly brings us to the end of our 32nd Crafting with Cats post. We do hope mew enjoyed it, and if mew decide to make your furry own Magic* Pumpkin Catnip Wand tag us on social media @BionicBasil.

Don't forget to check out our yearly Halloween tradition of Spooky Story Time on Purrsday in a **Brand New** B Team adventure called **The Purrminator**, as we know mew won't want to miss that! MOL  And we'll see mew bright and breezy on the morrow with a spooky Midweek News Round Up!

Spooky purrs

MUWAHAHAHAHAHAHAHAAAAAAAAA

Wing Commander Basil & The B Team 


Halloween Pawty Divider ©BionicBasil®

Don't furget to subscribe and never miss another post!

Halloween Pawty Divider ©BionicBasil®
Disclaimer:
We at BionicBasil HQ are not responsible or liable for any injuries to person/s and/or cat/s, crafting addictions, glue on cats, paper cuts, misplaced pins and needles, cats stealing your supplies, broken scissors, cat fur stuck on your projects, or your project not turning out as planned.  By using this information you hereby agree to indemnify and hold harmless BionicBasil and staff from and against any and all claims for personal injuries or damages of any kind arising from the use of any Crafting With Cats posts we may share.

Halloween Pawty Divider ©BionicBasil®
Graphics created with paid licence www.canva.com 

Music used under license from SoundStripe. Track: Jackolantern Jive   Artist: Lunareh 

Thursday, 17 October 2024

**Spooky Crafting With Cats** **RERUN ~ PART FIVE** How We Made The Trick or Treat Halloween Monster Truck aka MOG1

Welcome to

The B Team's Halloween Crafting with Cats Banner  ©BionicBasil® October  23

Supurr Spooky Greetings Pawesome Pals

Thanks for joining us for Part Five of our Halloween Crafting with Cats Rerun. Mew know we have so much fun making all this stuff and we hope mew enjoy seeing it!

If mew missed any of our previous CWC posts, stop by the Crafting with Cats Page and see all our previous projects, and mew don't have to be an expert in anything to make any of them.  Plus, we offer workarounds and no-sew projects for those who don't like to sew.


*    *    *
**A quick note before we begin**

All Crafting with Cats ideas and creations are of our own design, and we share them for purrsonal/home use only.

  So purrlease do not copy for commercial/resale purrposes.

Copyright ©BionicBasil® 

*     *     *

The Trick or Treat Monster Truck aka Mog1


DIYT cardboart unimog for cats with working lights, tow rope, aerial, 6x6,

Isn't it epic?

Halloween Pawty Divider ©BionicBasil®

What We Used:

3 x cardboard boxes

Non Toxic glue + Glue gun

Black spray paint

Black felt fabric

6 x Plastic jar lids for hub caps

Silver spray paint

Long wooden dowels to strengthen the pick-up bed

Extras: 

Hemp rope

Battery operated lights

Reflective stickers

Small round cardboard scratcher for steering wheel mount

Sticky back plastic

Pumpkin stickers

Long play wand with feather and bell for the aerial

Small cardboard reel for steering wheel

Silver paper for side windows

Halloween Pawty Divider ©BionicBasil®

Let's Get Started

1. & 2. We only had a small square box and a long shallow one when we started. And to be honest, we had no idea what to make, but then inspiration struck.

3. We cut halfway down on one side of the smaller box.

4. Then we cut out the windowscreen. Leaving the bottom edge attached.

5. 6. & 7. We glued the windowscreen on an angle to the side flaps and cut off the excess. Then, we folded the top edge down and glued it to the edge of the windowscreen.

 8. & 9. We used the windowscreen flap to make the nose of the truck and added a couple of pieces of leftover cardboard from the flaps of the shallow box. 

Halloween Crafting with Cats ©BionicBasil® The Trick or Treat Monster Truck Mog1 Step 10 -18

10. Next, we cut out the back of the box and opened up the cab.

11. 12. & 13. Then, we cut out the end of the shallow box and glued the flaps down, securing the cab to the truck bed.

14. At this point, we decided the top of the cab needed a light bar.

15. 16. 17. & 18.  So we created a long narrow box out of some spare cardboard we had in the craft room.

Halloween Crafting with Cats ©BionicBasil® The Trick or Treat Monster Truck Mog1 Step 19-27

19. 20. & 21. We glued the light bar in place, and this is what our Unimog looked like with no wheels.

22. 23. & 24. We cut 12 circles from the remainder of the shallow box flaps and 6 long strips to construct the wheels.

25. 26. & 27. We gently scored the edges of the long strips and carefully cut with scissors to the scoreline, creating lots of little tabs. Then, we gently bent the strips and glued them to the circles, creating the wheels.

Halloween Crafting with Cats ©BionicBasil® The Trick or Treat Monster Truck Mog1 Step 28-36

28. 29. & 30.  We glued the wheels to the Unimog, and this is how it looked.

31. Realising that we needed to add a bit of strength under the chassis so the truck bed didn't sag when we cats got in it, we used some long wooden dowels we had in stock and punched holes through the inner wheels and glued the dowels in place.

32. & 33. This was our finished mog pre-spray shop. Oh, we did add a jerry can, as we thought the back looked a bit flat.

34. 35. & 36. The Unimog went into the spray shop and came out black.

Halloween Crafting with Cats ©BionicBasil® The Trick or Treat Monster Truck Mog1 Step 37-45

37. & 38. We used some old paper stock to create the number plates and glued them to some small cardboard rectangles.

39. The Unimog was ready for customisation.

40. & 41.  We used some plastic jar tops for the hubs and sprayed them silver.

43. 44. & 45. We used a large piece of black felt to line the inside of the cab floor and truck bed and glued it in place using non-toxic PVA glue.

Halloween Crafting with Cats ©BionicBasil® The Trick or Treat Monster Truck Mog1 Step 46-54

46. 47. 48. & 49. Deciding that we needed a steering wheel, we found a small cylindrical cat scratcher in the craft room which was purrfect for our needs and just changed the colour on the sides with some sticky back plastic that we had in stock.

50. & 51. We used a small cardboard reel, leftover from some hemp rope and pulled one end off, and sprayed the remaining part silver and glued it into the existing hole in the scratcher before glueing it to the inside of the cab just below the window.

52. 53. & 54. Next, we added the number plates and silver hubs to the wheels.

Halloween Crafting with Cats ©BionicBasil® The Trick or Treat Monster Truck Mog1 Step 46-54

55. No Unimog is complete without a tow rope, so we added that next, glueing it under the truck nose.

56. Then, we added the battery-operated headlights and sidelight reflective stickers.

57. Then, we decided it needed a grill, so we used a small rectangle of cardboard and sprayed it silver before adding a pumpkin sticker.

58. & 59. We attached the lights to the light bar and tested them - EPIC!!!!!

60. 61. & 62.  Using some silver paper, we created the side windows and then made the sills from leftover cardboard sprayed silver.

63. Finally, we added the rear light-reflective stickersand a sticker to the jerry can, plus the long aerial toy was glued to the back of the truck bed. Mew can see Melvyn attacking in the video.

And there mew have it, only 63 supurr simple steps to making your very own Unimog! MOL 

But seriously, it didn't take long at all to make and considering we pretty much made it up as we went along, it didn't turn out too shabby. We also added one of our lovely snuggle mats in the truck bed to make it extra cosy.

And for those who'd just like to watch us make it, here are the videos.

Direct link to watch on YouTube

Direct link to watch on YouTube

Are mew ready for the video of The B Team with Mog 1? Of course mew are! 

Direct link to watch on YouTube

LET'S GO TRICK OR TREATING!

What do mew think of our Unimog for cats?

We think MOG 1 is probably the best thing we have ever made.


See our previous Halloween Crafting videos below:

Check out the epically epic Spooky House and Catnip Pumpkins 


and

The Halloween Crafting Special from 2019

The Pumpkin Pouffe with Catnip Leaves and Kicker Stalk Creepy Crafting with Cats ©BionicBasil®Halloween Special

Featuring oodles of fun projects including this giant furry pumpkin.


Gordon the Ghost Spooktacular Meowoleen Snuggle Mat 2021

Creepy Crafting With Cats Part XX ©BionicBasil® Spooktacular Meowoleen Snuggle Mat


Or check out our YouTube Channel for all our fun DIY Cat Stuff videos.


And that furiends furry sadly brings us to the end of our fifth Halloween Crafting with Cats Rerun; we do hope mew liked it, and feel free to post your pawesome crafty pics or ideas on our Facebook page at:


Amber will be here tomorrow with another fun book review. Until then...

Spooky purrs

MUWAHAHAHAHAHAHAHAAAAAAAAA

Wing Commander Basil & The B Team 


Halloween Pawty Divider ©BionicBasil®

Don't furget to subscribe and never miss another post!

Halloween Pawty Divider ©BionicBasil®
Disclaimer:
We at BionicBasil HQ are not responsible or liable fur any injuries to person/s and/or cat/s, crafting addictions, glue on cats, paper cuts, misplaced pins and needles, cats stealing your supplies, broken scissors, cat fur stuck on your projects, or your project not turning out as planned.  By using this information you hereby agree to indemnify and hold harmless BionicBasil and staff from and against any and all claims for personal injuries or damages of any kind arising from the use of any Crafting With Cats posts we may share.

Halloween Pawty Divider ©BionicBasil®
Graphics created with paid licence www.canva.com 
Music used under license from SoundStripe. Track: Wax on Wicks Artist: Empyreal Glow -  each video has its own content-id code.