Showing posts with label halloween crafts. Show all posts

Tuesday, 29 October 2024

**BRAND NEW PROJECT** Spooky Crafting With Cats ~ Part 32 ~ Halloween Special ~ How We Made The Supurr Fun Magic* Pumpkin Catnip Wand

The B Team's Halloween Crafting with Cats Banner  ©BionicBasil® October  23

Supurr Spooky Greetings Pawesome Pals

Thanks for joining us for a brand new Halloween Crafting with Cats post. Mew know we have so much fun making all this stuff, and we hope mew enjoy seeing it!

If mew missed any of our previous CWC posts, stop by the Crafting with Cats Page and see all our previous projects, and mew don't have to be an expert in anything to make any of them.  Plus, we offer workarounds and no-sew projects for those who don't like to sew.


*    *    *
**A quick note before we begin**

All Crafting with Cats ideas and creations are of our own design, and we share them for purrsonal/home use only.

  So purrlease do not copy for commercial/resale purrposes.

Copyright ©BionicBasil®

Halloween Pawty Divider ©BionicBasil®

The Magic* Pumpkin Catnip Wand

Halloween Special Crafting with Cats ©BionicBasil® The Magic Pumpkin Catnip Wand

 Isn't it epic?

*It's magic because it's got oodles of catnip inside! MOL MOL

Halloween Pawty Divider ©BionicBasil®

What We Used:

Orange faux fur fabric

Non Toxic glue + Glue gun

String

Green feathers

Tinkly bell

Wooden dowel

Catnip 

Stuffing or wadding

Needle ~ Thread ~ Scissors ~ Sticky Tape ~ Optional Sewing Machine

Today's project was made with supplies we already had in the craft room.

Halloween Pawty Divider ©BionicBasil®

Let's Get Started 

Halloween Special Crafting with Cats ©BionicBasil® The Magic Pumpkin Catnip Wand - Steps 1 - 4

1. We used some leftover fabric and other supplies in the craft room.

2.  We cut a circle for our pumpkin in the orange faux fur about 7.5" or just under 17 cm in diameter. (We used a 5L paint can to draw around!!! MOL)

3. Next, we cut three lengths of string as 48" or 108 cm.

4. Tying a knot to join them together.

Halloween Special Crafting with Cats ©BionicBasil® The Magic Pumpkin Catnip Wand - Steps 5 - 8

5. & 6. & 7.  Taping the string to the table, we plaited the three lengths together. We only did this because the sting was very thin and wouldn't have lasted two minutes with our claws. But if mew have a thicker string or twine, then mew can skip these steps.

8.  Place the string in the centre of the faux fur on the inside.

Halloween Special Crafting with Cats ©BionicBasil® The Magic Pumpkin Catnip Wand - Steps 9 - 12

9.  Stitch the string to the faux fur. The reason we did this is because most wand toys detach too easily, so we're trying to mitigate that.

10.  And for extra security, we added a blob of hot glue.

11.  Then, we did a simple running stitch all the way around the edge of the faux fur. Leaving the needle attached to the thread as it's needed later on. So, don't snip anything yet!

12.  Gently pull the stitches so the pumpkin shape begins to form. **Make sure the end of the thread is secure before pulling the stitches. Otherwise, mew will just pull all the thread out.

Halloween Special Crafting with Cats ©BionicBasil® The Magic Pumpkin Catnip Wand - Steps 13 - 16

13. & 14. The fun part!!! MOL   
Add as much catnip as mew want to the pumpkin, and then use some wadding to fill the rest to the top.

15.  Pull the stitches tighter so it's almost a fully formed pumpkin. Next, take the feathers and test them in situ for the right aesthetic.

16.  And then, using more hot glue, dab a little on the bottom of each feather and stick them into the top of the pumpkin. 

Halloween Special Crafting with Cats ©BionicBasil® The Magic Pumpkin Catnip Wand - Steps 17 - 20

17. & 
18. While the feathers are drying. Take the other end of the string and, using more hot glue, begin to secure the string to the end of the wand, wrapping it tightly and glueing it down as mew go until it reaches the bottom of the wooden dowel.

19.  Back to the top of the pumpkin. Pull the thread as tight as it will go and stitch the opening closed, making sure to secure the feathers as well. Then we used a small bell from another toy Melvyn recently destroyed in between the feathers. 

20.  Finally, using a little square of orange felt, we cut enough to make an end cap.

Halloween Special Crafting with Cats ©BionicBasil® The Magic Pumpkin Catnip Wand - Steps 21 - 24

21. & 
22. & 23.  Check that the felt is big enough to overlap the dowel and fold in half, then stitch either by hand or on a sewing machine across one end and down the side. Place a tiny blob of glue on the end of the wand, then push the wand into the end cap. 

24. And voila, mew should have a really nifty, supurr fun pumpkin wand toy.

And there mew have it, only 24 easy peasy, supurr simple steps to making your very own  Magic* Pumpkin Catnip Wand! MOL 

It took just under an hour to make, so not that long, and that's us making something that we had no clue about when we walked into the craft room and pondered over the supplies we had in stock, so it should take mew much less time.

Halloween Pawty Divider ©BionicBasil®

Let's see what Melvyn and Fudge Thought.

Halloween Special Crafting with Cats ©BionicBasil® Fudge and The Magic Pumpkin Catnip Wand

Smooch and Parsley were snoozing while these two heathens had some fun!

Watch our video on YouTube.

Direct YouTube link

Yes, they are loving it. Smooch did appear to investigate and was horrified to learn that it had been slobbered all over and promptly harumphed and stalked off in a huff, shouting at the P.A., "Mew'd better make me one all for myself!"

And before mew say a word, we know the pumpkin is too big to flick around, but it was more of a 'chase me' toy, as the P.A. wanted something that Melvyn couldn't kill and decimate totally in under three seconds. So far, the pumpkin has survived being severely stalked, pounced on, repeatedly pursued and kicked to fluff over the last few days.

But, the good news is, mew can always make the pumpkin any size mew want; a gold ball size would be purrfect for flicking.

Halloween Pawty Divider ©BionicBasil®

PURRLEASE NOTE

HEALTH AND SAFETY NOTICE

Just before we go, we must say,

 NEVER EVER EVER 

...leave your kitty unattended with: 

wand toys, teaser toys or any toys which could be a potential hazard

When we're finished playing, we always make certain that any ribbons or string are wrapped around the handle before being put away in the toy box until next time.

Halloween Pawty Divider ©BionicBasil®

And that furiends furry sadly brings us to the end of our 32nd Crafting with Cats post. We do hope mew enjoyed it, and if mew decide to make your furry own Magic* Pumpkin Catnip Wand tag us on social media @BionicBasil.

Don't forget to check out our yearly Halloween tradition of Spooky Story Time on Purrsday in a **Brand New** B Team adventure called **The Purrminator**, as we know mew won't want to miss that! MOL  And we'll see mew bright and breezy on the morrow with a spooky Midweek News Round Up!

Spooky purrs

MUWAHAHAHAHAHAHAHAAAAAAAAA

Wing Commander Basil & The B Team 


Halloween Pawty Divider ©BionicBasil®

Don't furget to subscribe and never miss another post!

Halloween Pawty Divider ©BionicBasil®
Disclaimer:
We at BionicBasil HQ are not responsible or liable for any injuries to person/s and/or cat/s, crafting addictions, glue on cats, paper cuts, misplaced pins and needles, cats stealing your supplies, broken scissors, cat fur stuck on your projects, or your project not turning out as planned.  By using this information you hereby agree to indemnify and hold harmless BionicBasil and staff from and against any and all claims for personal injuries or damages of any kind arising from the use of any Crafting With Cats posts we may share.

Halloween Pawty Divider ©BionicBasil®
Graphics created with paid licence www.canva.com 

Music used under license from SoundStripe. Track: Jackolantern Jive   Artist: Lunareh 

Saturday, 19 October 2024

**Spooky Crafting With Cats** **RERUN ~ PART SIX** How We Made the Epic **TWO-IN-ONE CAT SCRATCHER**

The B Team's Halloween Crafting with Cats Banner  ©BionicBasil® October  23

Supurr Spooky Greetings Pawesome Pals

Thanks for joining us for Part Six of our Halloween Crafting with Cats Rerun. Mew know we have so much fun making all this stuff and we hope mew enjoy seeing it!

If mew missed any of our previous CWC posts, stop by the Crafting with Cats Page and see all our previous projects, and mew don't have to be an expert in anything to make any of them.  Plus, we offer workarounds and no-sew projects for those who don't like to sew.


*    *    *
**A quick note before we begin**

All Crafting with Cats ideas and creations are of our own design, and we share them for purrsonal/home use only.

  So purrlease do not copy for commercial/resale purrposes.

Copyright ©BionicBasil®

*     *     *

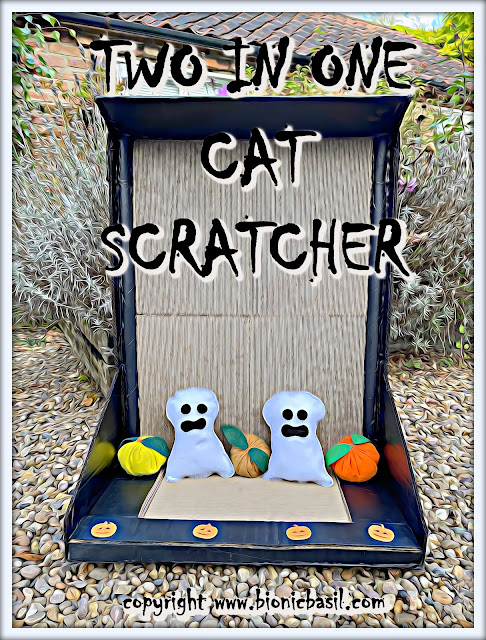
The Two-In-One Cat Scratcher


Crafting with Cats - Halloween 2023 ©BionicBasil® The Two in One Cat Scratcher

Isn't it epic?

Halloween Pawty Divider ©BionicBasil®

What We Used:

5 x pre-made cardboard cat scratchers (£17.99)

1 x  large cardboard box

Non Toxic glue + Glue gun

Black spray paint (+ face mask)

Black non-toxic paint

1 x cardboard tube

Mini Ghosts

White + black felt fabric

4 x pom poms

catnip 

stuffing

**See Gordon the Ghost link below, and just reduce the pattern size**

Halloween Pawty Divider ©BionicBasil®

Let's Get Started

CHAOS IN THE CRAFT ROOM

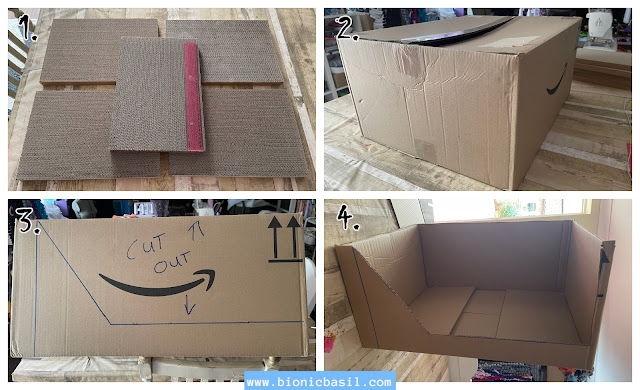
Crafting with Cats - Halloween 2023 ©BionicBasil® The Two in One Cat Scratcher - Steps 1 - 4

1. & 2. We had bought these five cardboard scratchers from Amazon with the intent of making something totally different, however they were much smaller than we thought, so idea one, was literally tossed out of the window. And a few minutes later, we had another idea, and that needed one large Amazon box, too.

(Note: mew could make your own scratchers - see our tutorial here)

3. Making it up as we went along, this is what we decided. First, we cut all the flaps off. And cut the side of the box out. 

4. This is what it looked like.

Crafting with Cats - Halloween 2023 ©BionicBasil® The Two in One Cat Scratcher - Steps 5 - 8

5. 6.  We repeated on the other side, and this is how it looked.

 7. & 8. Next, it was spray painted - always use a mask - and #8 was after a couple of coats   
(we didn't have time to apply more paint). 

Crafting with Cats - Halloween 2023 ©BionicBasil® The Two in One Cat Scratcher - Steps 9 - 12

9. & 10. Next we glued four of the scratchers in place to the back.

11.  Then, we glued the last one to the bottom.

12.  Using one of the flaps, we measured to make an infill piece.

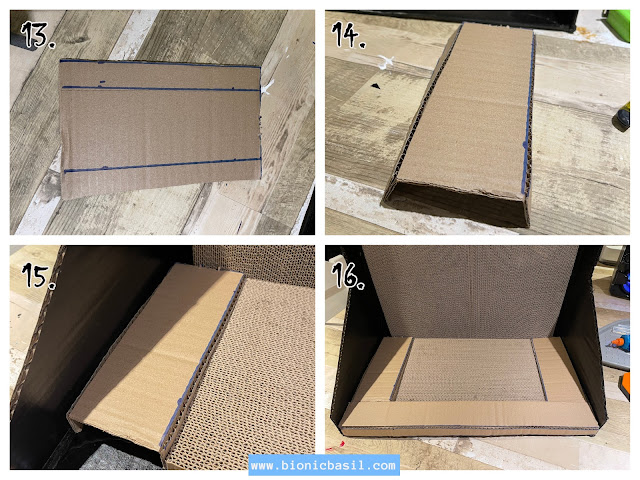
Crafting with Cats - Halloween 2023 ©BionicBasil® The Two in One Cat Scratcher - Steps 13 -16

13. 14. & 15.  This is what the infill looked like, we scored the sides along the line and bent them into postion, before gluing in place..

16.   We repeated the previous steps to make infills for the other side and front.

Crafting with Cats - Halloween 2023 ©BionicBasil® The Two in One Cat Scratcher - Steps 17 - 20

17. 18. & 19.  Taking a long wrapping paper cardboard tube, we cut it in half and glued along the sides of the other scratchers. So it filled in the tiny gap, and this is what it looked like.

20. Next, we scored and folded the top flap in half.

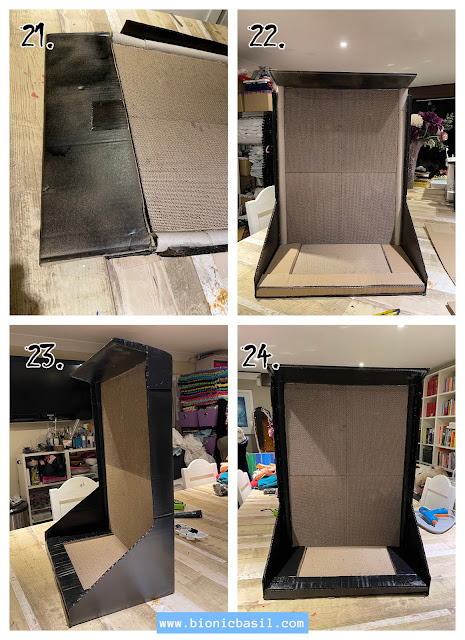
Crafting with Cats - Halloween 2023 ©BionicBasil® The Two in One Cat Scratcher - Steps 21 - 24

21. We glued it together.

22. Then, we glued the flap down, securing it to the edges of the box. And we painted the rest of the cardboard black.

23. If mew look at the top corner, mew can see we added a corner piece, as when we initially cut the flaps off in step 2, we were a bit slap dash and didn't cut it level so were left with a small gap, and this piece just covered our butchery! MOL

24. And this is what your Two-in-One Cat Scratcher should look like now. 

And there mew have it, only 24 easy peasy, supurr simple steps to making your very own Two-in-One Cat Scratcher! MOL 

It took just over a couple of hours to make, so not that long, and that's us making something that we've never made before so, it should take mew much less time.

Plus, we made the two small catnip ghosts and added the catnip pumpkins from the Haunted House project. See links below for instructions and other Halloween crafting projects.

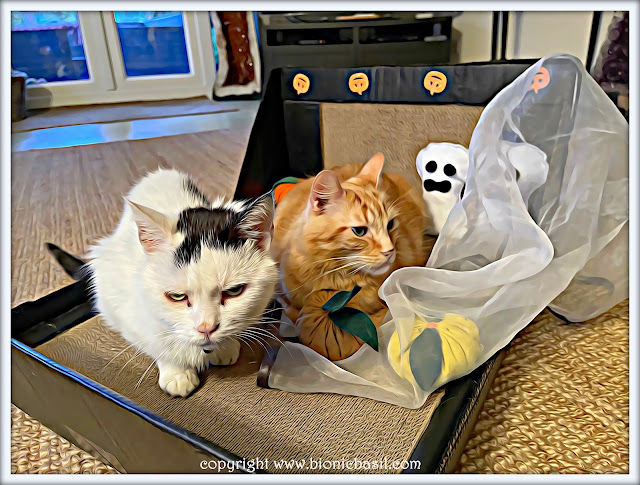
And we know mew're wondering why it's a two-in-one cat scratcher, well it was initially designed to go up a wall, thereby offering a nice tall scratching scenario, but then we realised that it could also be used flat, and it makes a wunderpurr bed and scratcher, so the choice is yours on what your purrsonal preference is, vertical or horizontal! MOL

Smooch and Fudge are demonstrating the horizontal position, and there's more than enough room for two cats, two ghosts and three pumpkins!

Crafting with Cats - Halloween 2023 ©BionicBasil® The Two in One Cat Scratcher - Horizontal with Smooch and Fudge

And Fudge demonstrates the vertical position.

Crafting with Cats - Halloween 2023 ©BionicBasil® The Two in One Cat Scratcher - Vertical with Fudge

Fudge has pretty much claimed ownership of it, and is currently reclining (Sunday Morning - we only finished it late on Caturday) in the horizontal position in the sitting room! MOL

And for those who'd just like to watch us make it, here is the video - it's only 28 seconds long for those short on time! 

Direct link to watch on YouTube

LET'S GET SCRATCHING!

What do mew think of The Two-in-One Cat Scratcher?

We think it turned out pretty well, given that we had no clue what we were making and that we were really short on time.

See our previous Halloween Crafting Posts Below:

Check out the epically epic Spooky House and Catnip Pumpkins 


and

The Halloween Crafting Special from 2019

The Pumpkin Pouffe with Catnip Leaves and Kicker Stalk Creepy Crafting with Cats ©BionicBasil®Halloween Special

Featuring oodles of fun projects including this giant furry pumpkin bed with catnip leaves and a catnip kicker stalk.


Gordon the Ghost Spooktacular Meowoleen Snuggle Mat 2020

Creepy Crafting With Cats Part XX ©BionicBasil® Spooktacular Meowoleen Snuggle Mat


The Trick or Treat Monster Truck aka MOG 1

DIYT cardboart unimog for cats with working lights, tow rope, aerial, 6x6,

Isn't it epic?

Here's how we made it ~ Click here


Check out our YouTube Channel for more fun DIY Cat Stuff videos.


Halloween Pawty Divider ©BionicBasil®

And that furiends furry sadly brings us to the end of our sixth Halloween Crafting with Cats Rerun; we do hope mew liked it, and feel free to post your pawesome crafty pics or ideas on our Facebook page at:


We'll be back tomorrow with another spooky selfie, and if mew missed Fudge's selfie last week, click here.

Spooky purrs

MUWAHAHAHAHAHAHAHAAAAAAAAA

Wing Commander Basil & The B Team 


Halloween Pawty Divider ©BionicBasil®

Don't furget to subscribe and never miss another post!

Halloween Pawty Divider ©BionicBasil®
Disclaimer:
We at BionicBasil HQ are not responsible or liable for any injuries to person/s and/or cat/s, crafting addictions, glue on cats, paper cuts, misplaced pins and needles, cats stealing your supplies, broken scissors, cat fur stuck on your projects, or your project not turning out as planned.  By using this information you hereby agree to indemnify and hold harmless BionicBasil and staff from and against any and all claims for personal injuries or damages of any kind arising from the use of any Crafting With Cats posts we may share.

Halloween Pawty Divider ©BionicBasil®
Graphics created with paid licence www.canva.com 

Music used under license from SoundStripe. Track:Rave Kids Artist: PALA